Sunday, November 2, 2014

Vaseline Voxbox

Earlier this week I received my first VoxBox from Influenster.com. Inside was a full sized bottle of Vaseline intensive care - advanced repair (fragrance free), a skin tester strip, and a note from Influenster. 

Before trying the product, I smelled it, and it smells nice, plain lotion. I've tried other fragrance free lotions that smell terrible, so I was happy to see (smell lol) that. The lotion itself is smooth, and left behind soft skin. It rubbed in well, and doesn't feel greasey. 

The before and after skin testing strips definitely show that the lotion works! 

I did wash my hands an hour or so after, and did feel that I needed to reapply, but that pretty typical for lotion for me. The effects don't last long on me. 

Overall I like the product, and am happy that it was a full sized bottle, so I have lots left to use! 


Disclaimer: I received this product free of charge, however all opinions are my own. 

Tuesday, March 18, 2014

Homemade Frosty Paws

December 1st was my dog's 6th birthday! I can't believe that it's been that long since we saw her in a little pen looking for a forever home. We fell in love with her the instant we put our paws on her!


Layla's favorite treat is ice cream! That dog is just like her momma, and loves her some ice cream, but I worry about her eating so much sugar and unnecessary processed ingredients. So we introduced her to frosty paws, and she loved them! The problem with them is they are expensive! If I was only buying it just for her birthday, it would be okay, but I like to give her treats more often than that! So I was glad to see this on Pinterest.

It is a super simple recipe for Homemade Frosty Paws! Essentially it is yogurt, peanut butter, a banana, and some honey. I had everything on hand except the yogurt, so that cost me about $3. I bought non-fat plain Greek yogurt. 

I also bought plastic single serving containers at the Dollar Store, but you could easily use egg cartons or ice cube trays. I bought two packs of ten for $2.

So I took the banana, peanut butter, and honey and blended them together. Then once they were well blended, I put the whole 32 oz container of yogurt in. Then blended again until they were all well mixed.

Then I took the mixture and poured it into the plastic containers. They are 2.3fl oz containers and this recipe filled all 20 of them, with a little left over to give the dogs a taste of whats to come. I then stacked the so cups into a gallon freezer bag, so that they weren't all over my freezer, and found a level (ish) spot and let them be for about 8 hours.

They froze up perfect! They are the perfect size for my pups. I'm sure they could eat 10 at a time if I let them, but I feel like it is just enough treat! They LOVED them! I wasn't sure my picky golden/chow mix would like them, since shes not a banana fan but I guess the yogurt and peanut butter cancelled it out enough. She could not get enough! That makes me one happy momma! 

I usually run the plastic container under hot water for a couple of seconds, and the "ice cream" puck pops right out of the plastic. That way they can eat out of their bowls and not lick it all over the house.

So around $5 in the store would have bought 4 servings of store bought Frosty Paws, but for my $5 I got around 20 servings! And since I bought reusable containers, I won't have to spend that at all next time! Score! When we eventually make it through all of these I will be making them again!

Thursday, March 13, 2014

St. Patrick's Day Mantel


I wanted to do a St. Patrick's Day mantel, but I hadn't collected a bunch of stuff for it like I had the other holidays (Valentine's Day and Halloween), so this one is super simple, but still puts the house in the spirit. I hung a large felt clover on fishing line up high. Then I made a simple clover fabric banner. I just cut up some fabric using pinking sheets to give it the zigzag look, and then sewed them all in a row. I hung the fabric banner, along with a green swag on my vintage window. Then I added a green bottle, and a standing photo frame with a green bow to the bottom, to tie it all together. 


Simple, sweet, and to the point. I also have clover hand towels in the kitchen, and Layla is sporting her St. Patrick's Day collar, so we're all set here! 


What are you doing to get into the luck' of the Irish spirit at your house?  


Linking up at:


Skip To My Lou

Tuesday, February 4, 2014

Valentine's Day Wreath


I decorated for Velentine's Day inside, with my mantel, but I wanted to do a little something outside too, so I threw together this quick Vantentine's Day wreath. 

***
The large pink heart is from Dollar Tree, the banner is from the dollar section of Target, and a simple black frame. I simply tacked the banner to the frame, and hung it in front of the felt heart.

Simple, quick, and cheap.
It also makes me smile every time I walk in the front door, so another win! 

Just enough outdoor decor to spread the love in my neighborhood. 

***
If you like what you see, follow me on Instagram and Facebook

Valentine's Day Mantel


Valentine's Day is one of my favorite holidays! I love all the pink, hearts, and love in the air! I decorated the mantel to get the house in the spirit. 
***
I used my vintage window was the backdrop again, just like my Halloween one. You can see I put some favorite photos in black frames, and fake roses with glitter hearts, in a pink vase. The pink wood LOVE sign is from Target, and the love box, is from the Dollar Tree. 


I got these glitter initials at Michael's a few months ago, and I knew they would be perfect for a V-day mantel. I love when buying things on sale on a whim works out... Months later! Haha! The felt hearts banner I made, but the hearts are from Martha Stewart's Michael's line. I just sewed them so they'd be strung together. The pink glitter clothes pins are from Target, and perfectly match the pink glitter star bursts that I got from the Target Christmas section! 


The "BE MINE" banner is from Michael's, and I just love how large it is, but I felt like I needed to fill the space it left, so I rigged up a dollar store felt heart on finishing line, so it looks like it is hung on the wall, not a string. 


The frame has some Hobby Lobby wrapping paper on one side, and a felt heart with "I Love You"  ribbon. And, of course, no Valentine's Day is complete without conversation hearts! 

***
If you like what you see, follow me on Facebook and Instagram!

Monday, October 21, 2013

Halloween Decor


Halloween is my favorite holiday, so now that we have a home, I was super excited to decorate it for it! I have had this up since about mid September, butI figured it was about time to blog about it, now that Halloween is just 6(!) days away! 

Here is a shot of the mantel, below you can see a "play-by-play" of my items. 


1. Bat cut outs. I image those lucky enough to have a Silhouette could use it to it these out, but Ihave access to an old school die cutter, that I used. Dana at made cut hers out by hand.

2. A vintage window that I picked up for $10 at a local antique shop.

3. Scrap paper bunting - I just free handed shapes, then sewed them together, putting about 3-5 stitches between each piece.

4. Halloween Photo Banner -  I printed photos at Walgreen's, then cut them into squares. I wanted to print them in black and white, but I forgot. I still like them though! I used mini clothes pins from Michael's to hang them on a Halloween ribbon, also from Michael's.


5. Happy Halloween Banner - I had a Halloween sticker pack from the dollar section of Target a few years ago. I used the letters and put them onto old book pages, that I cut into squares. Then I used craft glue to attach it to more Halloween ribbon from Michael's. 

6. I bought these vases at a local antique store, to spray paint black, but then changed my mind once the mantel started coming together. The purple flowers and glitter accents are from Michael's. .89 cents each, can't beat it, for a little glitz! 

7. Black Feather Boa - I draped it across the back, in front of the window base, to give a spook factor. There are also purple Halloween lights behind the window. I got then for about $5 from Michael's, but Christmas Tree Shops had them for about $4.

8. Miniature Bird Cage - from Michael's summer clearance section, for just 1 cent! Win!

9. Paper Mâché Skull - I had every intention of covering it in white tissue paper, but I never got to it. But there is always next year! 

10. Jar of Buttons - I wanted to pull my purple, black, green, and orange color scheme to really pull together so I threw some buttons in those color into a jar to add to the effect.

11. Saranac Jug - Joe bring it home, drank it, and I rescued it from the recycling bin!

12. Jar of [googly] eye balls - I bought a pack of Halloween/monster googly eyes at Michael's.

13. Owl - from Pier 1's 75% off section! after Easter. I keep him out all year, but thought he fit in on the Halloween mantel. He is one of my favorites!

14. Candle - large purple sparkle pilar candle from Michael's Halloween section. 


We also have some pumpkins on the front porch, and of course, holiday kitchen towels. 

I love coming home to all the decorations! 
This is my first try at a holiday mantel, but I love it, and that all that counts right?! 

Do you decorate for Halloween? Share your links below so I can check them out! I love getting new ideas from seeing what everyone else is up to.  


Absence Explained

So I apparently haven't written since April, really?! Oyeee! I have no excuses for April - July, but in July we bought a house, so it all went crazy from there! I have lots of home improvement project posts line up, but before that is Halloween! Its my favorite holiday, and this is the first time with a home, so I got to go all out (as I could manage) with my decorations. Post to come shortly! 

Until then, here is our home! 😊

Wednesday, October 9, 2013

Camp Half-Blood T-Shirt

Freezer paper is probably my favorite craft. So quick, so easy, so satisfying.

 This time I used it to make two Camp Half-Blood tshirts for Halloween. One for me, one for the tween I babysit for. She is big on the Percy Jackson/Heroes of Olympus series and wanted to be Annabeth for Halloween. I've read the PJ series, and am slowly but surely working my way through the Heroes books, so I decided to make one too. 


We printed a design off the internet, and then went about freezer paper stenciling it onto orange tshirts from Michael's. We bought them on sale, her regular fit was about $3, my ladies fit was $6. 

Dana from MADE has a great freezer paper stenciling tutorial, chech it out here. www.danamadeit.com/2008/07/tutorial-freezer-paper-stencil-makenna-loves-goldfish.html

I am planning on wearing mine on Halloween too, but I'll either be Piper or Hazel, depending on what accessories I come up with between now and then! 

Freezer paper is great for custom shirts, onesies, or anything you want monogrammed! 

My tween and I have plans to make Camp Jupiter shirts next, yellow print on purple tshirts. Maybe in the next couple of weeks... 

Thursday, April 11, 2013

How To Print Instagram Photos At Walgreens

So the other day, web going through my personal ocean of emails, I got one from Walgreens, that in one tiny spot advertised they were now printing Instagram photos. I immediately investigated! Before we start there are two very important steps:

Step one: Be in love with Instagram
Step two: Have a Walgreens nearby

After that, all you really need is a smartphone, tablet, or other similar device.


Download the free Walgreens app on your phone. Once its downloaded, open the app and click the photos icon. 

The photos menu gives you a few options for where to get photos from, including Instagram and Facebook.

Click the "print from Instagram" option. You will then by prompted to log in. After that you should see your Instagram photos, just select which ones you want to print, which Walgreens location you them printed to, and proceed to check out!

The nice part about printing from the app is you don't have to make a Walgreens username or password, you just put your name, phone number, and e-mail address. Once you've checked out, you photos should be ready in about an hour, and when they are you'll get an e-mail.

You pay in-store, so no credit card information goes through your phone. At my local store the prints cost .29 cents each, and because I've shopped there before I had an e-mail code for 25% off. A bargain in my book!

Then just head to your local Walgreens photo section, and pick up your super cool 4x4 photo prints!


I am in love with these cute little prints! I'm hoping to make something similar to this:

 [ Source ] 

It is an Ana White clothesline picture frame. I makes it so easy to swap out the pictures. Hope you enjoy your prints! I am absolutely addicted, and now I love Instagraming more than ever!


Monday, April 8, 2013

Polka Dot Pizza

My fiance and I love pizza! We're both born and raised in New York, so essentially "Life without pizza, is no life at all!" We actually met while we were both working at a pizza place, in high school, so pizza has always been a part of our relationship. However, now that we live in Maryland, we've realized that good pizza down here is hard to come by. This triggered us to started making out own. Its not only cheaper, but it also gives us the freedom to experiment.

My favorite to make at home has both fresh mozzarella and fresh tomatoes, but I hate having to deal with the cooked tomato skins when I'm biting into a slice, so I came up with Polka Dot Pizza!


You'll need:
Cookie sheet
Cooking spray
Pizza dough (regular or whole wheat)
Olive oil
Crushed garlic
Grape tomatoes
Fresh mozzarella
Spices
Fresh basil

Instructions:
Its very simple, start by rolling out your dough. I used Giant brand whole wheat dough, but you can use whatever kind you like. Lay the dough in a greased cookie sheet, then rub a little olive oil, and crush garlic into it.

Then take grape or cherry tomatoes, and slice them in half. Then put them onto the oiled dough, flat side down.

Slice fresh mozz and place the slices ontop of the tomatoes. I shook some dried Italian seasoning, and some crushed red pepper, before baking for 10 - 15 minutes.

Chop up basil, and when the pizza comes out, sprinkle onto.


Finally, cut up, and enjoy! I love that you can get a half a tomato in each bite, so no fighting with tomato skin! Yeay!

Sunday, January 6, 2013

Little Button Pouch


I saw this tutorial on Pinterest, and since it takes only a little bit of fabric, I got right to it. First I made it with a button loop, but The loop broke, so I just put in a buttonhole. I use this when I carry my big purse to put my iPhone and iPad cords in. I love the pop of hot pink on the inside.


Here is the tutorial from Our Busy Little Bunch:
http://www.ourbusylittlebunch.com/2012/03/mini-clutch-tutorial.html

Quilted Christmas Tree Pants

So I wanted to make a Christmas tree skirt to match the stockings that I made last year. I had a bunch of left over fabric, so I used the scraps to essentially create a quilt that I turned into a tree skirt. Technically, these are tree pants because, it's square not round, but it serves the same purpose, and I love it just the same! 


I cut 6.5" squares, then sewed them into rows, then sewed all the rows together into a quilt top. I bought the cheapest battling I could find, and it was nice and puffy, just the way I wanted it. After it was all sandwiched, I used the largest pot lid in my house to trace the hole, then cut it out.


 I then bound the whole thing in red bias tape that I purchased as Hancock Fabrics. I sewed extra pieces on for the bows to secure it around the tree. 


Fold Over Zipper Clutch


After being MIA for so long, the other day, I decided that I needed to sew something. I needed to make something that I could just sit down, and sew, in a single sitting. After trolling Pinterest, I figured a fold-over clutch was a pretty easy project. I had made zippered pouches before, and figured this wasn't far off, so I gathered a bunch of tutorials, and got to work.

I had a bag pictured in my head, I just had to recreate it. I choose to make my pieces 11" x 15". (Which made for a 10" x 14" finished product.) I knew I wanted a zipper, metal specifically. I had to buy a 14" zipper, it cost about $4 at Hancock Fabrics, and cut it down. I also knew I wanted a back pocket, and an inside pocket.

I also bough a 7" metal zipper for a back pocket, that was about $2.75. I used all the tutorials below, to create the bag that I had in my head.

Lastly, I added the bow. It is made from felt, the $0.25 a sheet kind, so I might replace it with something better, but not yet.

I love the way it turned out. The inside is black fleece, which I regret, making the inside of a purse black, is never a good idea...

Other than that I love it. Espeically now, in the winter, the pop of yellow is a reminder, that summer is on its way.

 
Here are the tutuorials that I used to create my bag:
Kill Them With Craftiness - http://killthemwithcraftiness.blogspot.com/2012/04/tutorial-clutch-with-fabric-rosette-pin.html?m=_

Eighteenth Century Agrarian Business - http://www.ecabonline.com/2011/05/fold-over-clutch-metal-zipper.html?m=1

Oh Sweet Joy - http://www.ohsweetjoy.com/2012/02/handmade-monday-oversized-fold-over.html?m=1

Fab Handmade - http://fabhandmade.blogspot.com/2011/09/fold-over-clutch-tutorial.html?m=1

Sew Mama Sew - Zipper Pocket - http://sewmamasew.com/blog2/2007/07/tutorial-zippered-and-slip-pocket-tutorial/


Saturday, January 5, 2013

Post Christmas Christmas Sewing...

Finishing up a Christmas sewing project today... Totally normal right? Haha! Full post to come later, be sure to check back!

Sunday, December 30, 2012

Bagel French Toast

On Christmas, we got a dozen bagels for breakfast. Since then we have been eating them. Yesterday I had one toasted, it wasn't great... So this morning, we still had three left, and I knew there had to be something to do with them. Lightbulb: make French toast! Usually we use stale bread, so why not stale bagels?!

What you'll need:
- Stale bagels
- Eggs (I used three eggs for two large bagels)
- Milk
- Vanilla Extract
- Butter to cooking spray

I don't measure the milk or vanilla, I just eyeball it.

Crack the eggs in a medium sized mixing bowl. Add the milk and vanilla, the mixture should have a brown tinge to it. Cut the bagels into quarters. Turn on your pan, skillet, or griddle. I use a square flat non-stick skillet, but electric or cast iron griddles work great too.

Dip the bagels in the egg mixture. Let them soak a little longer than you would do with bread. The egg doesn't really permeate the outside of the bagel so make sure you let the inside suck up plenty.

Put a pat of butter, or spray the pan with cooking spray. Then place your soaked bagel pieces on it. I use butter because I think it gives a better crisp to the eggs. Cook until the pieces are golden brown, then flip, and cook the other side until it is also golden brown. I also stand the bagels up on the flat sides where they were cut to cook that surface as well.

Once all your pieces have soaked and cooked, serve with butter and syrup. So yummy!


Friday, December 28, 2012

MIA...

I have been MIA for a while now, sorry about that. I switched jobs, so I've had much less time for sewing and crafting. I used to work overnights, which left lots of time, but now that I work the 9-6 grind, there is not much.

I had made a few things, here are the highlights.

I made this monogram towel for a friend's wedding gift. I gifted them three microfiber towels that I bought at bed, bath, and beyond and personalized with appliquéd Ps. Each out of a different fabric, one fall themed (they married in October), one Christmas themed, and one snow themed (high hopes on here on the eastern shore of md!). Along with the towels, I cut up their wedding invitation, into strips, curled the strips, and put them into a clear Christmas ornament.


I also made a tutu for my niece for her halloween costume. Her dad is a huge Superman fan, so we made her supergirl for halloween. I made the tutu using a a headband and tulle on spools. The t-shirt was bought at Gap and we added glitter glue to spruce it up.


Another halloween craft I did was a tutu, for my pup. She was the cowardly lion to my (hipster) Dorothy. The thing I did differently was I tied the tulle to both the top and bottom of the headband, instead of just one side.


Hopefully I can start keeping better track of what I am up to. Definitely look for more photography based posts. My amazing fiancé bought me a totally awesome Sony NEX-f3 for Christmas, and I am psyched to put it to work!


Linking up at:
Weekend Bloggy Reading

<div align="center"><a href="http://www.iheartnaptime.net/" title="I Heart Nap Time" target="_blank"><img src="http://www.iheartnaptime.net/wp-content/uploads/2012/02/logo_Sundae2.png" alt="I Heart Nap Time" style="border:none;" /></a></div>


Tuesday, March 6, 2012

Santa to Leprechaun

Okay I am sure you all are thinking, that's weird that looks like a Christmas onesie, but its March... Well you would be right! However bear with me, I promise by the end this will be a St. Patrick's Day post!

I made this cute onesie and tutu set for my favorite little girl to wear in some fun photos for her first Christmas. I made it knowing that six month olds don't really wear tutus for extended periods of time. It was just a fun prop for her. 

So anyway I didn't blog about it then but I came across the picture in my phone and something clicked, that same onesie but paired with a green tutu she would look like a leprechaun! So I called her Momma and asked if the onesie would still fit, she confirmed, so off to Hobby Lobby I went! (Please use your talented imaginations for the picture at the right, I wasn't able to get a picture of her in it)

I picked up a white headband for .79 cents and a roll of tulle using my 40% off coupon it probably came to $3.00. I know that the rolls of tulle aren't as economical, but they make the tutu making process so much easier. Hobby Lobby didn't have a kelly green in either the bolt or rolls so I went with an apple/lime green. I wish it was kelly but I think it will work for her first St. Patrick's day celebration just fine. The color would actually be perfect for a Tinker Bell costume, so I will probably add more tulle to it so that it can do double duty later in life.

The onesie is just fleece and felt that I cut to look like a belt (Santa's belt in December, and conveniently a Leprechaun belt in March). I ironed it on using wonder under, and then sewed over it to make sure it wasn't going anywhere. 

The tutu doesn't have to go with the belted onesie, it can easily go with any other St. Patrick's onesie that she has. Including the Shamrock one I made her.

So an appliqued belted onesie, a green tutu, some adorable shamrock tights/leggings and she is going to make just about the cutest little leprechaun that ever was!

Tuesday, February 28, 2012

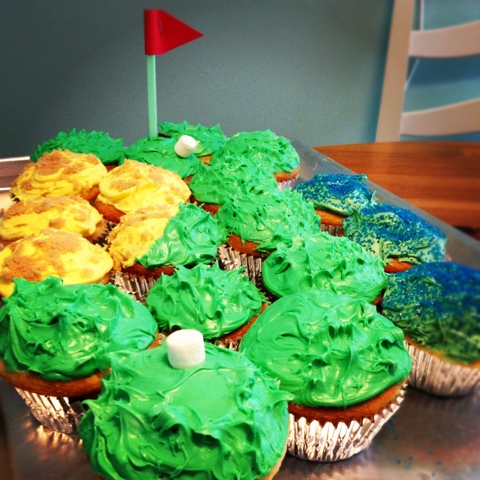
Golf Course Cupcake Cake

This is not a pinterest fail to me just a pinterest different.


I made is cake for my then boyfriend (now fiancé) for his birthday last February. He loves to golf so when I saw this cupcake cake on Pinterest, I wanted to make it, but knew it would come out like hers. I don't have e tools and I know that, so I made it my way, and I think it turned out great!


http://pattycakesbakery.blogspot.com/2011/05/whats-new-cupcake.html?m=1

I just made a boxed mix for the cupcakes, and used Pillsbury vanilla frosting. My guy doesn't really like sweets, so I knew if I made from scratch it would have been a lot of work for little reward.

I separated the frosting into containers and mixed them with food coloring. I added brow. Sugar to the yellow ones to simulate sand. I added blue sugar to the blue cupcakes to simulate water. The green, I gave some texture to look like grass. The hole is an upside down chocolate chip.

I made a flag out of paper and a straw, and used mini marshmallows as golf balls.

Simple easy, and much less time consuming than from scratch, but still a fun "wow" factor from the unsuspecting recipient.

I love the way it turned out, and Joey was very surprised!