This is not a pinterest fail to me just a pinterest different.
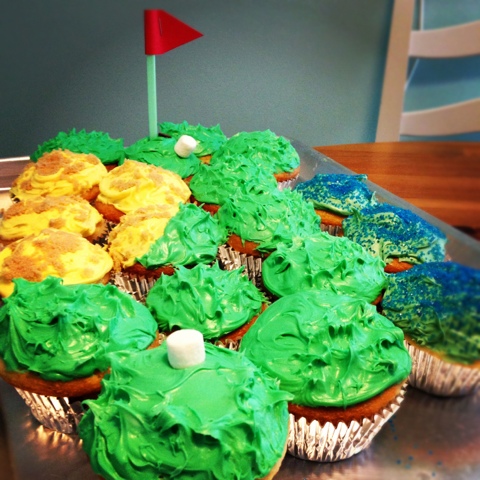
I made is cake for my then boyfriend (now fiancé) for his birthday last February. He loves to golf so when I saw this cupcake cake on Pinterest, I wanted to make it, but knew it would come out like hers. I don't have e tools and I know that, so I made it my way, and I think it turned out great!
http://pattycakesbakery.blogspot.com/2011/05/whats-new-cupcake.html?m=1
I just made a boxed mix for the cupcakes, and used Pillsbury vanilla frosting. My guy doesn't really like sweets, so I knew if I made from scratch it would have been a lot of work for little reward.
I separated the frosting into containers and mixed them with food coloring. I added brow. Sugar to the yellow ones to simulate sand. I added blue sugar to the blue cupcakes to simulate water. The green, I gave some texture to look like grass. The hole is an upside down chocolate chip.
I made a flag out of paper and a straw, and used mini marshmallows as golf balls.
Simple easy, and much less time consuming than from scratch, but still a fun "wow" factor from the unsuspecting recipient.
I love the way it turned out, and Joey was very surprised!
Tuesday, February 28, 2012
Friday, February 24, 2012
St. Patrick's Day Onesie
Another holiday, another holiday project! So...
HAPPY ST. PATRICK'S DAY!!!
This is the last onesie that was shipped up to New York for my BFFs daughter a few weeks ago. You can check out the other ones here and here.
I just did a simple, standard, applique process. I use fusible interfacing on all my appliques. In the past I did not use it, then I did a project with letters, that tend to be more noticeable if they are crooked, so I tried it. Ever since I used it that once, I was hooked! It is not that expensive (especially on sale!) and it really gives a nicer finished product.
I googled clover/shamrock to find a shape that I liked. I cut out a square of fabric big enough, and ironed on fusible interfacing on the wrong side. Then I traced it onto the paper side of my fabric using my laptop screen as a light-box.I cut out my shape. Ironed it on to the cotton onesie. Then I carefully sewed around my shape using a zigzag stitch.
I thought I was finished but I thought it didn't look girly enough for that cute girlie so I made a little bow out of a green polka dot fabric and hand sewed it onto the stem of the shamrock. Perfect!
Thursday, February 23, 2012
Banana Chocolate Chip Muffins
I saw this yummy looking recipe on Skip to my Lou. It sounded easy enough and I happened to have two over ripe bananas just looking for a job. She made hers in some adorable polka dot baking cups but I made mine in a regular old greased muffin tin and they came out great.
They were very yummy! The chocolate is the perfect consistency and the muffins are dense but not dry or hard. Totally perfect, so much so that I have already made them twice! :)
Wednesday, February 22, 2012
A Shamrockin' Collar
Valentine's day is officially over! At my house we don't just change our decor we change the dogs collars. You can see my other collar creations here and here. Since the next holiday is upon us, so it is time to switch our my pups collars! Goodbye conversation hearts, hello shamrocks!
I made these just like the Valentine's Day collars with the nylon webbing fused in-between the fabric "bias tape."
Layla's webbing is pink. Dylan's is green.
Don't they look adorable?!
(PS - This blog newbie is LUCY! Her mom LOVES St. Patrick's Day so I knew Lucy
had to have a Shamrockin' collar to help her celebrate too!)
Layla's thoughts on pictures...
Tuesday, February 21, 2012
Valentine's Day Photo Shoot
Happy Belated Valentine's Day!
I know I had a few before Valentine's Day projects posted but I wanted to do an after post too.
I did a little Valentine's day photo shoot of my dogs using my iPhone. I even snuck into a few shots. The dog already had their pink collars on. I grabbed a red tie from my repurposing pile to put on Dylan. Layla got a big bow tied from a v-day bandana. The backdrop is simply a quilt tucked into my closed dresser drawers.
The pictures were originally to send toy my boyfriend who, unlike me, works normal hours. Just to send some Valentines day love from home while he's at work. I was having so much fun with it, I kept going! Sometimes when you're home alone you have to make your own free fun! So have some fun with it! Bring in whatever props you have, or think would look cute. This can be done for any holiday. Green sheet backdrop for St. Patrick's day or Easter. Red for Christmas, the possibilities are endless!
I hope you all had an excellent Valentine's Day with whoever or whatever you love! My adorable boyfriend got me these beautiful roses, some Lindt truffles, and a wonderful dinner out. We had a great time and it was nice to get dressed up and go out on a weeknight, it made the week feel shorter.
The two top pictures were edited using instagram and frametastic (both free from itunes)
Faux Chenille Blanket
It is finally, FINALLY, done!!!
I started this blanket so. so. so. long ago. Whenever I would get frustrated by it whether it be because a pin pricking me one too many times or just being beyond bored, I would just put it off to the side for another day, another week, another month, another season. But the other day I bunkered down and finished it and I am so. so. so. glad that I did! I am madly in love with it!
This is not a tutorial as I used Aesthetic Nest's and MADE's tutorials for making this beautiful blanket. These are just how I did it, and my thoughts about it.
or four ...
I started this blanket so. so. so. long ago. Whenever I would get frustrated by it whether it be because a pin pricking me one too many times or just being beyond bored, I would just put it off to the side for another day, another week, another month, another season. But the other day I bunkered down and finished it and I am so. so. so. glad that I did! I am madly in love with it!
This is not a tutorial as I used Aesthetic Nest's and MADE's tutorials for making this beautiful blanket. These are just how I did it, and my thoughts about it.
I used a heavyweight cotton from Hancock Fabrics for my top fabric, and four layers of flannel for my bottom layers. The two layers closest to my top actually have really ugly patterns on them but you can't really tell since they are covered and cut. That was one way that I cut the costs.
I did not use glue, or saftey pins (just straight pins). I used a chalk line (out of the boyfriend's tool box) to make my first line. My fabric didn't shift too much but I do wish I had used saftey pins because with so much fabric flapping around its hard to see where they are and not get pricked. I wish I had used the chalk line a few more times to straighten out every so often, since when one line gets out of whack it can lead to all of them being that way. Luckily you can't even really tell now that it is washed, but just a thought.
When I was sewing I was initally not taking my needle out just leaving it down and turning my blanket, but once I started doing it the proper way, I liked how taking the needle out and clipping off the extra thread broke up all that sewing.
I cut using my erganomic spring assisted scissors and I think that they made it easier not to cut through the top fabric than regular scissors. I do wish I put one more layer in and left it uncut, I missed my lowest layer in some sections and I like the look a little better.
The biggest problem I had with it was how to "square it up" (mostly because I was making a rectangle, not a square) once I finished all the sewing. I trimmed the clearly wonky ends with scissors then tried to clean it up with the rotary cutter. I could still tell that it wasn't totally perfect, then I got over it! It was as straight as I was ever going to get it, and who was really ever going to notice? I also rounded the edges because it looked so cute on both of the tutorial blankets, I used a plate as well.
I am not a very patient sewer, but once I looked at Dana's bias tape tutorial over at MADE I knew that I needed to take my time and do it the right, or proper, way as Dana calls it. Which meant going around not once, but twice. But it was totally worth it! I knew I would have messed up if I had done it the sandwhich way. The right way, gave me a little more control over sewing it in a straight line. It came out just as beautiful as I had hoped!
I am so happy with this blanket. It took me forever and drove me nuts. It is almost maddening to make, but once it comes out of the dryer, you don't remember any of it. It makes it all seem totally worth it. It is so plush, heavy, beautiful, and perfect. I wish I had the patience to make a bigger one that me and my love could snuggle under together, but it will probably never happen. So this one will have to do.
Everyone loves to snuggle this blanket, no matter how many legs you have...
two...
or four ...
I'm not sure if I will ever make another one of these blankets, because it is so time consuming, but if I found the right sale on flannel, I just might be tempted...
Tuesday, February 14, 2012
Vintage Valentine Iphone Cover
Just another paper insert. This time its an adorable vintage valentine. Just size, print, cut, and stick in the case. Happy Valentines Day!
Subscribe to:
Posts (Atom)


