Wednesday, December 28, 2011

Handmade Christmas Stockings

Well I know that it is after Christmas, but my holiday season has been crazier than usual, so I since I didn't even get these finished until about a week before Christmas it’s not surprising that I'm not getting a blog post about them up until a few days after Christmas has passed. I still want to post them though, so that you all can see how adorable they are!

My sister asked me if I thought I could make stocking this year. Our mom made the stocking that we used growing up, and that my mom still displays. My sister wanted that tradition to carry on in her home. So we hit the fabric store. She wanted something a little more modern so we didn't go with straight red and green. The fabrics we picked have purples, and turquoises, along with the reds and greens.

I attempted to make the first one after some brainstorming, it was going okay, but after looking around on Follow Me on Pinterest Pinterest I found this tutorial for making stockings. It made it so easy! She really did a great job and it creates a clean beautiful result!


I used regular cottons and muslin. No quilting or batting involved at all. The appliqués that I chose to do are defiantly what took the longest. If I hadn't been doing them these would have come together even quicker than they already were! It was an easy to follow tutorial and came out just the way I had hoped. The hardest part for me was figuring out which way to sew the band fabric on so that the words were the right way on the finished project.

Other than that brain teaser it went perfect! My last pinterest inspired project was a fail but this one was pinterest perfection! Here is how they turned out:

                                     ornaments applique

reindeer applique                 and              christmas tree on top of a jeep 

Friday, December 23, 2011

Christmas Dog Collars

I sewed up some dog collars, assembly line style for the pups! I got my claps on Etsy but they are available at your local fabric or craft store as well.


I essentially made a wide double fold bias tape. I did put iron on interfacing/wonder under type stuff in between for some stability. Then just weave it through the maze of plastic clasps. Sew well. I stitched and back stitched about a million times to make sure that they were super strong for my beasts lol.


My 75lb golden chow mix has been wearing it for about 2 weeks and it is still holding up well.


I love the way they came out. I chose a fabric with a small pattern on it do that you could really get the christmas pattern on the one inch thick collar.


Although it will be kind of depressing to slip the slip on bandana over it lol.

Tuesday, December 6, 2011

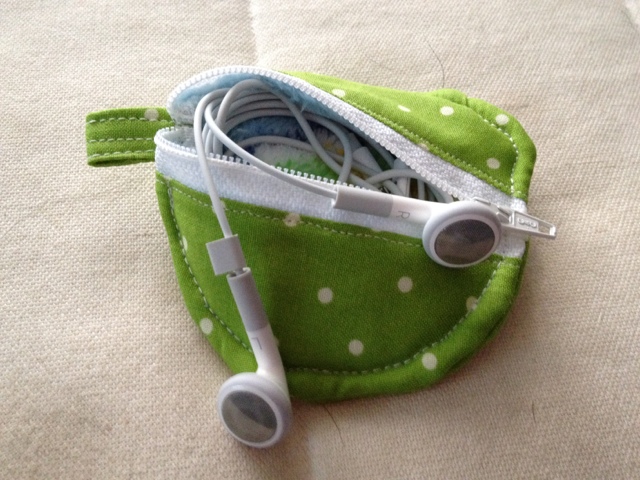
Pinterest Fail: headphones pouch

I've gotten so much inspiration from reading blogs and surfing pinterest. They make me want to do better, create more, and strive to be an impeccable sewer. However it doesn't always go as planned...

As a dog lover I've been on the Dog Under My Desk blog before so I knew she makes cute stuff, but when I saw this pinned and followed the link I was glad to see that she had been busy since the last time I had been over!

I have made many little pouches and lined pouches so when I saw this I was pretty sure I could tackle it without a problem, boy was I wrong! It had nothing to do with the directions, unless you count not following them! Ha!

Looking back I think that what I did wrong was a seam allowance issue. Also I used really shaggy stretchy minky that I had never worked with before. So all those played into me messing this up. I am planning to make another one once I get another zipper. Check out the pictures to see just how badly it went. So much for making these for Christmas presents!

Monday, December 5, 2011

Interchangeable iPhone Case


This is amazingly simple! I use scrapbook paper as an insert in a clip on clear iPhone case!


I found a clear iPhone case at target for about $3 on sale. You can get them on eBay too for just as inexpensively. I have also seen them for older models at the DOLLAR STORE!
When I bought my case it had a paper iPhone inserted into it, so I took that and took and exacto knife and cut out the camera hole.

Then I traced that onto the back of my pretty scrapbook paper. You can also easily trace your phone or the case to get the camera slot right. Then just slip the paper in and click the phone on top and you're good it go! I change mine about once a week sometimes more sometimes less but it keeps it fun and lets me control what I looks like.

I have so much scrapbook paper and no longer scrapbook, so it's nice to have a little project to put some of it to work. I have thought about using glitter paper but I worry about loose pieces getting stuck in all the nooks and ports of my beloved white iPhone, so we'll see.

Tuesday, November 29, 2011

Slip on Bandanas

I love how my golden retriever/chow mix looks when she is wearing a bandana. It just gives her a little additional cute factor, something unique. And that becomes even more unique when the bandanas are something that I hand selected fabrics for and handmade myself.


The reason I don't just cut the fabric into a square with pinking sheers and tie it on is simple. My dog is constantly going in and out of the house, she gets put on a run/line and a regular bandana often gets in the way. Also wears a training collar for walks and traditional bandanas gets in the way of that too because it makes her have 3 items go all the way around her neck. These slip on (to any collar) bandanas stay in place (on the back of her neck) because of the balance of her buckle and ID tags. They make putting on a leash. line, or training collar much easier. They work great for us I hope they will for you as well!

The measurments I used for this bandana are for my 80lb golden/chow mix, but this can easily be made for whatever size dog you need just follow my directions for the correct measurments. 

First thing you need to do is measure you dogs collar. I measured the space between where her ID tags hang, all the way around until the buckle, this was 15 inches. Then I measured that her collar has a 1 inch width.


So depending on if you want your bandana reversible, and if your fabric has an orientation to it you need to start with either a square of fabric or 2 triangles (that you sew into a suqare). On my first one I cut the corners then just folded a lip to cover the raw edge, since then I've found it easier to just fold them (the red areas in the left graphic) in instead of cutting, less work same result. Just make sure that the straight line is more than double your collar thickness.


Sew down these corners. I used a zigzag stich to help with fraying.


Fold with right sides together. Find the center. Sew from the bottom of the collar width area (1 1/2 inches  down in my case)  to the midpoint and back up making sure to stop before the other side of the collar area. I've marked it here with a red dotted line. Make sure to backstitch at the edges so that its nice an strong for turning.


You should be able to turn the triangle right side out throught one of the hole that have been left for the collar. Once you've done this you should topstich across right below the openings. I've shown it here in red dotted line. This just helps it keep its shape and makes it fit the collar better.

Now you should be able to slip your collar through the open ends and buckle it on to your pup!


Here are some pictures of my dog's Halloween, Thanksgiving/fall, and Christmas slip on bandanas.

Thursday, November 17, 2011

Flo and Mayhem Costumes

So my boyfriend and I were invited to a Halloween party and since I'm big into Halloween and we've somehow never done matching costumes I made it happen this year. We went as Flo from the Progressive commercials, and Mayhem from the Allstate commercials. They were both really easy and can be done from things right in your closet.


Flo is easy. I wore a white button down shirt and white jeans. I already had the plain white apron but if you don't it is only about $5 from Target. Then progressive actually has a website to print the name tag, progressive, and I heart insurance button. Then I just glue stocked them to a cereal box, cut them out and taped a safety pin to the back. Pinned them to the apron, put on my orange convereses, a watch and all that was left was hair and makeup. I put some neutral eye shadow on. Used liquid liner to create a thick line that curved and gave a cat eye effect. Then put some bright red lipstick on. Simple a that. I had to buy the makeup. It was less than $5 at Walmart, but I know that most people won't have to. I got a "bump-it"  and a navy blue headband at the dollar store. I used the tallest bumpit in the set. A little teasing, and a whole lotta dollar store hair spray, and BAM! you're suddenly Flo!

Mayhem is pretty simple too. Mayham aften wears a three piece suit, but we didn't have any luck finding one of those. We got my boyfriend a suit jacket from Salvation Army, and beat it up a little with the seam ripper and some sand paper. He wore a white shirt and a black tie with his black jacket and slacks. While we were at the dollar store, we found a pink cell phone (for 16yr old girl mayhem) and a pink headband (for hot runner mayhem). We also got him some bandaids to put on his face. I used some eye shadow and red lipstick to "beat him up" a little.

Pretty simple right!? We had a great time and pretty much everyone knew who we were. And I'm pretty sure we were the best dressed couple around! :)

Russell from Up! For halloween

I know it's late but I thought I would post it anyway. I was Russell from the Pixar movie Up for Halloween. I picked it since my dig is pretty much a dead ringer for Dug.

My first step was googling Russell the character an then googling other peoples costumes. I saw that I needed some wilderness explorer patches, a badge sash, his hat and backpack.

I bought a bunch of 4/$1 felt from Hobby Lobby. This is what I made the patches out of. I just googled a picture if the wilderness explorer logo and recreated it with the felt. Then I sewed one onto a khaki hat, one onto a yellow button down shirt ($1.75 from the Salvation Army) and one onto a felt pendent/flag thing from Hobby Lobby (2/$3 - %50 off coupon = $1.50). I also created a different WE patch from felt and grosgrain ribbon that is sewed on lower on the shirt. I also bought a $1 solid orange bandana from Hobby Lobby. Then I threw on a backpack (with the flag pinned to it), brown khakis, and hiking boots. The hardest part if the costume would have been the badge sash but luckily my sister had a girl scout one that I borrowed and it worked perfectly.

You can't tell in the pictures and couldn't really tell in real life either (sad face), that I made Layla a solid brown collar out fo some broadcloth and  felt to mimic Dug's collar, but Layla had to much hair for it to make a difference. Either was most of the kids we saw during trick or treating with the kids I babysit for knew who we were. And that made me happy!

Since it was cold and I didn't want to cover my costume, I wore thermals, wool socks, and a yellow long sleeve shirt under my clothes to keep warm.